3D Visualisation
3D visualisation renders the current design as an interactive scene. You can inspect approaches and related distances, view the course from above, run an automatic camera, or export a video.
The viewer has separate controls for the scene and for video recording. Use Options to change what the 3D scene looks like. Use Video to select a camera, configure the beginning and end of its animation, and choose the output format.
Quick start
Open and navigate the viewer
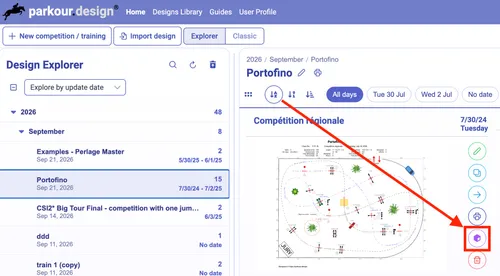
- Open a design and click the cube button, or choose 3D Model from the Project menu. Wait for the scene to finish loading.
- Click inside the scene. The mouse pointer disappears so you can look around by moving the mouse.
- Hold W to move forward. Use A, S, and D to move left, backwards, and right. In free flight, hold Space to rise above the arena and Control to descend.
- Press G to switch to walking on the ground. Approach an obstacle, look along a related distance, and press Space to jump. Press G again to return to free flight.
- Press Escape to release the mouse when you want to use the buttons. Help, or ?, shows the available controls.
Start with the Standard profile. If movement is slow, open Options, choose Performance, and click Save. Use Design view for a fixed overhead view with larger labels and dimensions.
Run an automatic flyover
Make sure the design has a connected course route, then click Flyover or press F. The first camera is Drone: it travels around the moving course position, giving you changing views of the fences and their surroundings.
Press F again to try Follow the horse, then Entire arena in perspective, then Entire arena from above. Another press stops the sequence and returns to the view you started from. If you have captured your own camera movement, its replay is included before the stopped state.
For camera and timing controls, stop the flyover and open Video.
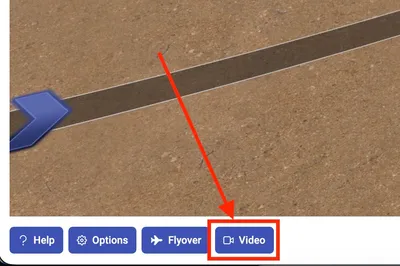
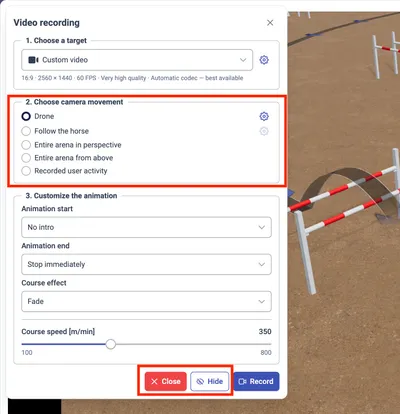
This starts a repeating preview. Change the camera or animation settings to restart or update the preview. Click Hide to remove the dialog while the preview continues; click the scene to show the dialog again. Close ends the preview.
Export a video
- Open Options, select a scene profile, and click Save.
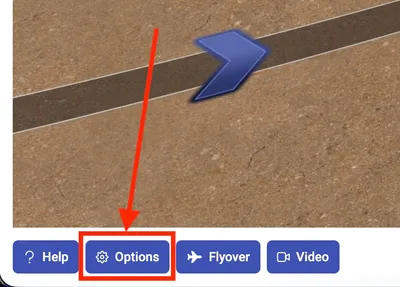 Start with Standard; use Performance if the viewer is slow.
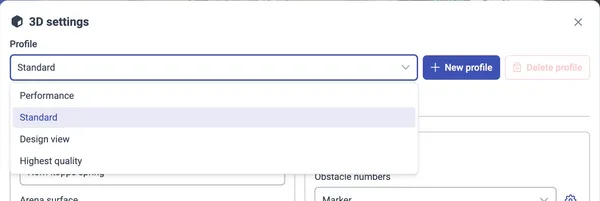
- Click Video, or press V when no flyover is running.
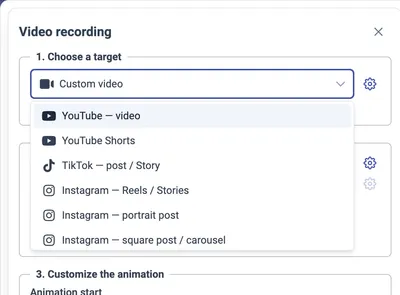
- In Choose a target, select a preset with the required aspect ratio and resolution.
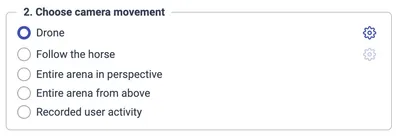
- In Choose a camera, select Drone, Follow the horse, a fixed arena view, or a recorded camera path.
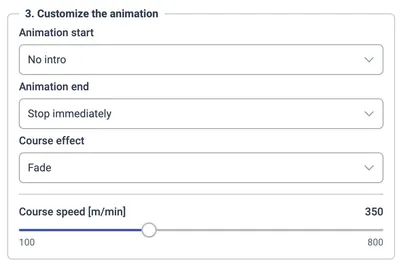
- In Customize the animation, select the camera’s start and end behaviour, the course effect, and the route speed.
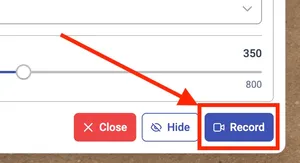
- Check the preview, then click Record. The browser downloads the file after rendering and encoding finish.
The exporter renders at the resolution selected in Video. Export may run more slowly than real time, but the downloaded file uses the selected 30 or 60 frames per second. Browser-window size and live preview speed do not determine the exported resolution or playback speed.
Record a manual camera path
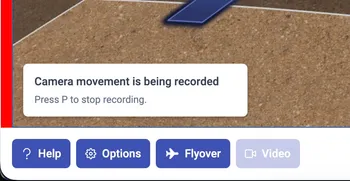
Position the camera at the required starting point. Press P, move and look around, then press P again.
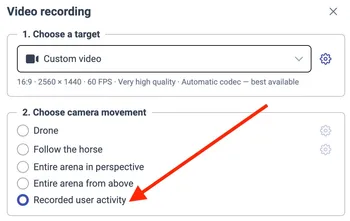
The Video dialog opens with Recorded user activity selected. Choose the remaining video settings and click Record.
Pressing P captures camera movement; it does not create a video file. Record exports that captured movement. The capture remains available until you close the 3D viewer or replace it with another capture.
Opening and leaving the viewer
In the design editor, choose Project → 3D Model, press Command-S on macOS, or press Windows-S on Windows.
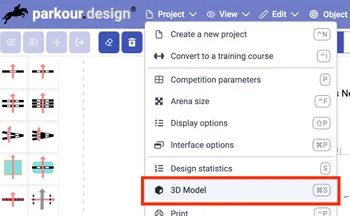
You can also open a design’s 3D preview from the My projects screen.
For the best performance and stability, use a desktop or laptop with a capable graphics card. When you start the 3D simulation on a phone or tablet, Parkour displays a warning before it allocates graphics resources. Mobile devices may run the animation slowly, become hot, or close or crash the browser tab. Choose Cancel to return without opening the viewer, or Run anyway if you accept the risk of a less reliable experience.
A computer with a keyboard and mouse gives you access to the full navigation and camera capture workflow. The viewer also supports touch controls, including a virtual joystick and command buttons when enabled in the interface settings. Compact layouts show some footer buttons as icons, but successful operation on a mobile device is not guaranteed.
Clicking the scene captures the mouse for navigation. Escape releases it. Escape can also leave browser fullscreen, stop an active flyover or export, or close the viewer once those active states have ended. Use the visible Close button when you want an unambiguous exit. Enter also closes the main viewer.
Viewer settings are saved when you close it. Inside Options, use Save to keep your edits or Cancel to discard that settings draft. A captured camera path is temporary: export the video before closing the 3D viewer.
Movement and keyboard reference
Free flight and walking
Free flight lets you move through the scene without colliding with its objects. Use it to inspect the arena from above, pass through a fence, or position the camera before a manual capture.
Walking on the ground enables ground-level movement and collisions. It gives you a closer impression of the scale of the fences and the view along an approach. Space becomes a jump control. Switching movement modes also places you at that mode’s starting viewpoint, so expect the camera position to change when you press G.
| Control | Action |
|---|---|
| W / Up arrow | Move forward in the direction you are facing. |
| S / Down arrow | Move backwards. |
| A / Left arrow | Move sideways to the left. |
| D / Right arrow | Move sideways to the right. |
| Mouse | Look around and choose your direction of travel while the pointer is captured. |
| Q / E | Turn left or right with the keyboard. |
| Space | Rise in free flight; jump when walking. |
| Control | Descend in free flight. |
| G | Switch between free flight and walking; stop an active flyover. |
| Shift, held | Temporarily double the manual movement speed. |
| + / = and − | Increase or decrease the navigation speed setting in steps of 5. During a flyover, these address the flight-speed setting. Use the video window’s route-speed slider to control automatic camera timing. |
| Mouse wheel | Narrow or widen the field of view. |
The mouse wheel changes the camera’s viewing angle, rather than moving it closer to an obstacle. A narrower field of view makes objects appear larger; a wider one fits more of the arena into the image. For an actual change of viewpoint and perspective, move the camera.
Viewer commands
These shortcuts apply while you are controlling the viewer. When a settings window is open, use its controls; viewer shortcuts are suspended so typing into fields does not trigger scene commands.
| Key | Action |
|---|---|
| ? | Show or hide the help overlay. |
| O | Open Options. |
| F | Start or advance through the automatic camera views, then stop. |
| V | Open Video when idle; stop an active flyover or finish an active video export. |
| P | Start or stop capturing manual camera movement. During an automatic flyover, stop it and open video settings. |
| 0 (zero) | Request fullscreen for the scene. Use Escape to leave fullscreen. |
| Escape | Release the mouse or leave the current active state; close the viewer when idle. |
| Enter | Close the main viewer. |
| 1 | Cycle the course display through Classic line, Strip with edges, and hidden. |
| 2 | Cycle course animation through Off, Arrows, and Points. |
| 3 | Switch the course path between Through obstacles and Over obstacles — jump trajectory. |
| 4 | Cycle audience stands through one to five rows and off. |
| 5 | Show or hide obstacle dimensions. |
| 6 | Cycle obstacle numbers through Marker, Label above obstacle, and No numbers. |
| 7 | Turn shadows on or off. |
| . / > | Move the time of day forward by half an hour. |
| , / < | Move the time of day backwards by half an hour. |
The footer offers Help, Options, Flyover, Video, and Close. During video export, Stop replaces Video. When command buttons are enabled, additional icons provide the scene toggles, movement-mode switch, and time-of-day control.
3D Options
Open Options or press O.
These settings control both the live scene and its appearance in exported video. The General tab contains scene appearance, navigation, and course display. Advanced contains rendering and shadow controls. Information lists the authors, licences, and modifications of the included 3D models.
Most appearance changes have a live preview. Cogs open detailed settings for the adjacent feature. In these smaller windows, Apply accepts the changes into the main Options draft; finish with Save in the main window to keep the complete setup. Cancel discards the draft. Changes to rendering-engine settings or shadow-map resolution take effect after saving and an automatic scene reload; the window displays a notice when this is required.
Profiles
| Profile | Starting setup |
|---|---|
| Standard | A balanced scene with anti-aliasing, a 2048-pixel shadow map, and two rows of audience stands. |
| Performance | A lighter scene with anti-aliasing off, a 1024-pixel shadow map, no audience stands or cars, and no computers or people in the judges’ box. |
| Design view | A top view with a clear classic course line, animation off, large floating obstacle numbers, and visible dimensions. Useful for reading the layout. |
| Highest quality | Anti-aliasing, a higher live-view pixel limit, a 4096-pixel shadow map, high shadow smoothing, and five rows of stands. |
Choose a profile, adjust it, and Save. Built-in profiles can retain your adjustments; Load defaults restores the selected built-in profile’s factory setup.
To keep several looks, adjust the scene and choose New profile, enter a unique name, and create it. The new profile copies your current settings. Save it before switching away. Delete profile is available for custom profiles and returns the selection to Standard; built-in profiles cannot be deleted.
Profiles store viewer settings in your user preferences. They do not store a captured camera path or act as video-target presets.
General settings
Scene
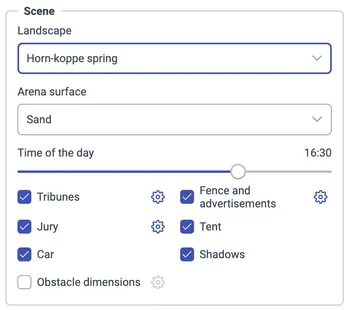
Landscape selects the surroundings: Aarfontein dusk, Horn-koppe spring, Quarry, or Scythian tombs.
Arena surface chooses Sand or Grass for the arena’s appearance.
Time of the day changes the sun position, lighting, and shadows in half-hour steps. Use the slider or the comma and full-stop shortcuts. The landscape image and simulated sun are controlled separately.
Tribunes toggles the audience stands. Its cog opens Audience stand settings, where you can set one to five rows, occupancy from 0% to 100%, and seat colour. Occupancy controls how many seats contain spectators; zero occupancy leaves the seats in place. More rows and people make the scene busier and require more rendering work.
Jury toggles the judges’ box. Its settings let you independently show Computers and People inside the building.
Tent and Car independently show or hide all service tents and cars placed in the design. Tent fabric and car body colours belong to the individual objects rather than the 3D profile. Select a service tent or car in the design editor and use Tent color or Car color in its object settings. Each placed object can have its own colour, and the 3D viewer uses those saved colours automatically.
Fence and advertisements controls the arena fence and banners with ads.
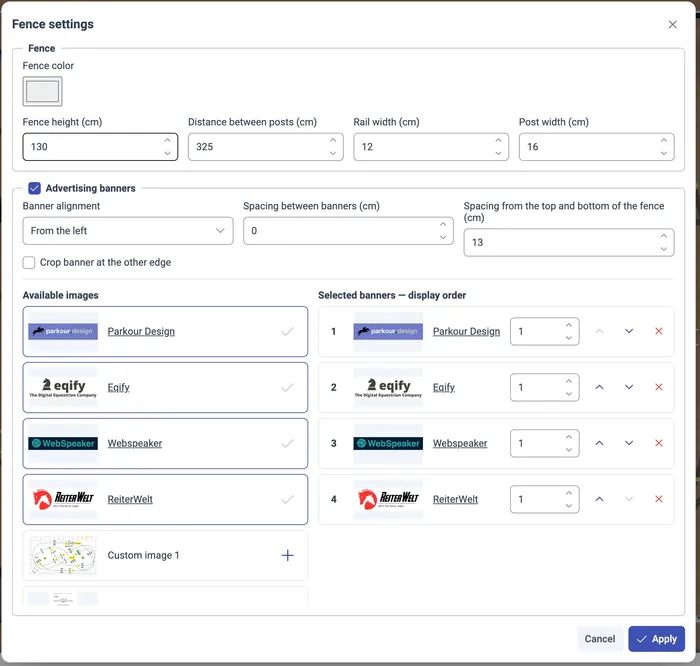
Fence settings control the arena’s perimeter fence:
| Setting | Effect |
|---|---|
| Fence colour | Changes the fence material colour. |
| Fence height | Sets its height in centimetres. |
| Distance between posts | Sets post spacing in centimetres. |
| Rail width | Changes the width of the fence rails. |
| Post width | Changes post width; it must be at least the rail width. |
Enable Advertising banners to place artwork along the fence. Available images includes built-in artwork and images from your uploaded image library. Add images to Selected banners — display order, then use the arrows to rearrange them. Set Number of banner repetitions to repeat an image consecutively, from 1 to 100 times. Removing a banner from this list removes its placement, not the source image from your library.
Banner alignment places the sequence from the left, from the right, or distributes it evenly. Spacing between banners controls the horizontal gap. Spacing from the top and bottom of the fence controls vertical margins and therefore the available banner height. Images retain their proportions, so their width also depends on that height. Crop banner at the other edge allows a final banner to be trimmed to fit the remaining space.
Enable Obstacle dimensions to show dimension annotations for the obstacles. The cog controls:
- Fill colour and outline colour for the text.
- Outline thickness, from 0% to 50%, to improve contrast against the scene.
- Text size, from 10 to 400 cm.
- Distance from obstacle, from 0 to 300 cm, to move annotations away from the obstacle.
These controls change annotation appearance and placement. Change the obstacle itself in the design editor when you need different dimensions.
Appearance
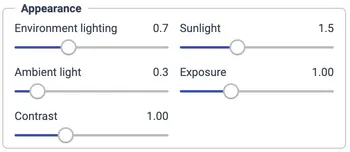
The Appearance controls adjust the light:
| Setting | Effect |
|---|---|
| Environment lighting | Adjusts the contribution of the surrounding environment to materials and reflections. |
| Sunlight | Adjusts the strength of the directional sunlight. |
| Ambient light | Adds general illumination, helping surfaces remain visible away from direct sunlight. |
| Exposure | Brightens or darkens the overall image. |
| Contrast | Changes the separation between light and dark tones. |
| Shadows | Enables or disables cast shadows. Detailed shadow settings are in Advanced. |
Change one control at a time. If the shaded side of a fence is hard to see, increase ambient light a little. If the whole scene is too dark, adjust exposure. Very strong light or exposure can wash out pale poles and labels.
Course
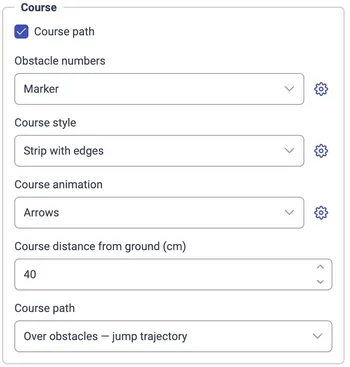
The Course path checkbox shows or hides the base route. Choose Classic line for a narrow coloured line or Strip with edges for a wider band with distinct borders.
The classic-line cog controls line width, from 1 to 200 cm, and separate colours for rounds 1, 2, and 3. The strip cog controls width, from 5 to 300 cm, strip colour, edge colour, and transparency from 0% to 100%. Zero is opaque; 100% makes the strip itself transparent.
Course distance from ground sets the route’s base height, from 1 to 200 cm, shared by the line, strip, and animation. Raising it can make the course easier to see against the arena surface.
The Course path dropdown controls vertical shape:
- Through obstacles keeps the route at its base level through the fences.
- Over obstacles — jump trajectory lifts the route over the obstacles to illustrate the jumping path.
The jump trajectory is a visual explanation of the route, not a prediction of an individual horse’s jump.
Course animation adds Arrows or Points, or can be switched Off. These overlays are independent of the base course line, so you can display movement without the line or strip.
For Arrows, the cog sets speed (0.1–20 m/s), arrow width (5–300 cm), spacing (5–1000 cm), and a colour for each of three rounds. Closer spacing creates a more continuous indication of direction; wider spacing leaves more of the scene unobstructed.
For Points, set speed (0.1–20 m/s), size (5–300%), and colours for the rounds. These animation speeds control the moving symbols, separately from the automatic camera’s route speed in metres per minute.
Choose Marker for a physical number marker, Label above obstacle for a floating label, or No numbers. The cog controls marker size or label diameter, from 20 to 250 cm.
Markers have separate colours for each round. Floating labels have separate circle and text colours for each round, making it possible to choose a strong contrast for an overhead view. Larger labels are useful for an entire-arena video; smaller markers leave a close camera shot less crowded.
Controls
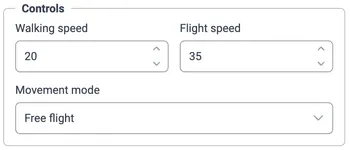
Movement mode selects free flight or walking. Walking speed controls manual movement, including manual free flight; its range is 5–100. Flight speed also has a 5–100 range and is the flight setting addressed by the speed shortcuts during a flyover. To set the duration and pace of the automatic camera sequences described in this guide, use the video window’s 100–800 m/min route-speed slider.
Advanced rendering settings
The settings in this section are under Options → Advanced tab. They control the live 3D engine and scene rendering.
Rendering engine
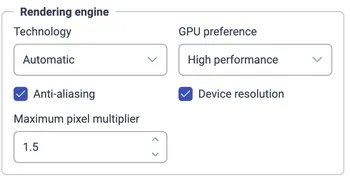
| Setting | What it does |
|---|---|
| Technology: Automatic | Tries WebGPU and can use WebGL if WebGPU cannot be initialised. |
| Technology: WebGPU / WebGL | Explicitly selects that rendering technology. If it is unavailable, select Automatic or another supported technology. |
| GPU preference | Requests High performance or Power saving from the browser. This is a preference, rather than a guarantee of a particular graphics processor. |
| Anti-aliasing | Smooths jagged edges in the rendered scene. |
| Device resolution | Lets the live viewer account for the screen’s pixel density. |
| Maximum pixel multiplier | Caps the live-view pixel-density multiplier between 1 and 3, in steps of 0.25. Higher values can give sharper detail on dense displays but increase rendering work. It applies when Device resolution is enabled. |
Save these changes to reload the scene. The video exporter uses its own selected width and height, so increasing the live-view pixel multiplier is not required to export a high-resolution video.
Shadow settings
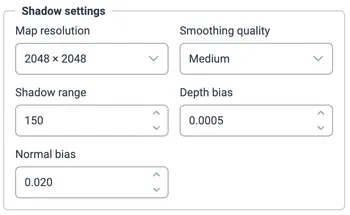
| Setting | How to use it |
|---|---|
| Map resolution | Choose 1024 × 1024, 2048 × 2048, or 4096 × 4096. Higher resolution can retain finer shadow detail but uses more resources and requires a scene reload. |
| Smoothing quality | Low, Medium, or High controls filtering of shadow edges. Higher settings favour smoother edges. |
| Shadow range | Sets how far the shadowed region extends, from 50 to 500. A larger range covers more space; a smaller range concentrates the available shadow detail. |
| Depth bias | A small depth offset to reduce false shadow patterns on surfaces. Range 0–0.01. Too much can separate a shadow from its object. |
| Normal bias | Offsets shadow calculations along the surface direction to reduce self-shadowing artefacts. Range 0–0.1. Excessive values can displace shadows around edges. |
Start with a profile’s defaults. Change bias settings in small steps only when you can see unwanted shadow patterns or displaced edges, and check the result from more than one camera angle.
Video Recording
Open Video or press V while no flyover is running. The camera, start/end animation, course effect, route speed, and all export settings can be configured in this section.
Automatic cameras follow the route defined in the design. Connect the obstacles in the intended order before viewing the course animation in 3D. If the rendered design contains multiple rounds, the animation processes their routes in sequence.
When Video is opened, the live preview starts and repeats indefinitely. Changing the camera restarts the animation.
Hide keeps the preview running without the overlapping recording window, whereas Close ends the preview and closes the window. Record always starts the export at the beginning of the selected sequence.
1. Choose a target
A target selects a preset combination of aspect ratio, resolution, frame rate, codec, and compression quality. Selecting a target does not upload anything to the named service.
| Target | Default dimensions | Frame rate | Codec / file | Quality |
|---|---|---|---|---|
| YouTube — video | 2560 × 1440, landscape 16:9 | 60 FPS | H.264 / MP4 | Very high |
| YouTube Shorts | 1080 × 1920, portrait 9:16 | 60 FPS | H.264 / MP4 | Very high |
| TikTok — post / Story | 1080 × 1920, portrait 9:16 | 30 FPS | H.264 / MP4 | High |
| Instagram — Reels / Stories | 1080 × 1920, portrait 9:16 | 30 FPS | H.264 / MP4 | High |
| Instagram — portrait post | 1080 × 1350, portrait 4:5 | 30 FPS | H.264 / MP4 | High |
| Instagram — square post / carousel | 1080 × 1080, square 1:1 | 30 FPS | H.264 / MP4 | High |
| Facebook Reels | 1080 × 1920, portrait 9:16 | 30 FPS | H.264 / MP4 | High |
| Custom video | 2560 × 1440, landscape 16:9 | 60 FPS | Automatic | Very high |
The summary below the target shows the actual settings that will be used. Open its cog to customise them. Each target keeps its own edited settings while you switch between targets in the recording workflow. Load defaults restores the selected target’s original values; Save accepts changes and Cancel discards the draft.
Aspect ratio and resolution
Aspect ratio chooses the shape of the picture: 16:9, 9:16, 4:5, 1:1, or 4:3. Select it before judging the composition in the preview. A tall frame can suit a close moving shot, while a wide frame gives a combination or an entire arena more horizontal space.
Resolution offers HD, Full HD, QHD, and 4K UHD, using 720, 1080, 1440, and 2160 pixels on the shorter edge. The menu displays the resulting width and height for your chosen ratio. For example:
| Resolution | Landscape 16:9 | Portrait 9:16 | Square 1:1 |
|---|---|---|---|
| HD | 1280 × 720 | 720 × 1280 | 720 × 720 |
| Full HD | 1920 × 1080 | 1080 × 1920 | 1080 × 1080 |
| QHD | 2560 × 1440 | 1440 × 2560 | 1440 × 1440 |
| 4K UHD | 3840 × 2160 | 2160 × 3840 | 2160 × 2160 |
Higher resolution preserves more detail in poles, numbers, text, and banners. It also increases rendering work and memory use. Export resolution is independent of the live viewer’s pixel multiplier and browser window size.
Frame rate and compression
30 FPS requires fewer frames to be rendered. 60 FPS produces smoother camera movement but requires roughly twice as many frames for the same duration.
High quality and Very high quality control compression. Very high quality favours retaining more visual detail, generally at the cost of larger files. Neither option is a fixed file-size target: the codec, resolution, duration, and scene all affect the result.
Scene quality and video quality are separate choices. The Highest quality scene profile improves the rendered scene, while resolution and compression determine how that image is stored in the video. Increasing export resolution does not add spectators or improve a low-resolution shadow map.
Codec and file format
| Choice | Output | How selection works |
|---|---|---|
| Automatic codec — best available | MP4 or WebM | Tries HEVC, AV1, VP9, then H.264, selecting an encoder supported at the requested output settings. |
| H.264 / AVC | MP4 | Requests H.264 explicitly. All the named platform presets start with this option. |
| HEVC / H.265 | MP4 | Requests HEVC explicitly. |
| VP9 | WebM | Requests VP9 explicitly. |
| AV1 | WebM | Requests AV1 explicitly. |
An explicit codec selection must be supported by the browser at the chosen resolution. If recording fails, try Automatic, or another codec and a lower resolution. Automatic selection can produce a different file extension on different devices. If you need an MP4 file, select one of the MP4 options explicitly.
2. Choose camera movement
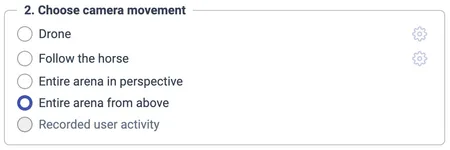
Drone
Drone follows the moving course position while orbiting around it. Its camera height remains at the selected level, while the distance varies gently to create movement towards and away from the course. It looks ahead along the route and can widen the view around upcoming obstacles.
Open the cog beside Drone to adjust:
| Setting | Range and default | How it changes the shot |
|---|---|---|
| Camera height [m] | 2–30 m; default 6.9 m | Higher values reveal more of the layout. Lower values bring fences and surrounding objects closer to eye level. |
| Distance from horse [m] | 3–40 m; default 11 m | Sets the base distance from the moving course position. The camera varies this distance during the shot. Increase it for more context. |
| Rotation speed [°/s] | 0–90; default 25 | Controls the orbit around the moving position. Zero removes the continuous orbit, although the camera still follows and turns with the route. Lower values produce a calmer shot. |
| Target lead [m] | 0–15 m; default 2.8 m | Sets how far ahead along the route the camera looks. More lead brings the upcoming approach into view sooner. |
| Automatic obstacle framing | On by default | Increases camera distance and widens the field of view near obstacles to give the jump more room in the frame. |
Start with the defaults, then reduce rotation speed if changes of viewing direction feel too busy. For a vertical video, try increasing distance or height if a wide fence or combination is cut off at the sides.
Follow the horse
Follow the horse places the camera at an offset from the moving position on the course, turning with the direction of travel. The name describes the camera’s reference point along the route; these settings control the camera, not a ridden-horse simulation.
| Setting | Range and default | How it changes the shot |
|---|---|---|
| Height above ground [m] | 1–20 m; default 3 m | Sets the camera’s height above the ground. A low view emphasises the approach; a high view reveals the line between fences. |
| Distance from horse [m] | 1–30 m; default 6 m | Sets the horizontal offset from the moving course position. Larger distances show more of the surroundings. |
| Angle relative to horse [°] | −180° to 180°; default 0° | Zero follows from directly behind. Around ±90° gives a side view; ±180° places the camera ahead, looking back. Positive and negative angles choose opposite sides. |
Camera height is fixed above the ground while its aim follows the course position. The angle is relative to the direction of the route, so a side view changes its orientation as the course turns.
Both camera settings windows preview changes immediately. Save accepts them, Cancel returns to the previous values, and Load defaults restores that camera’s initial settings.
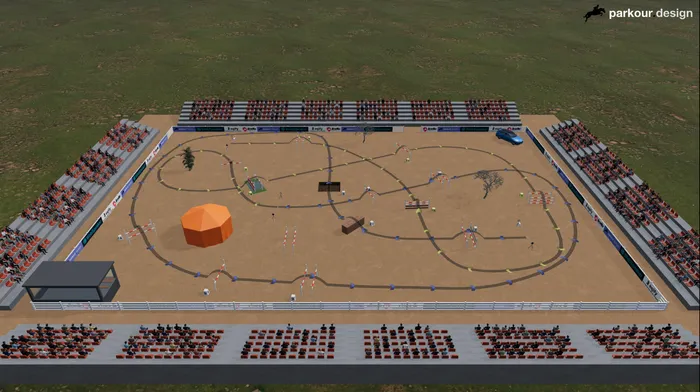
Entire arena in perspective
This camera remains in a fixed, elevated perspective view and frames the arena for the selected video shape. Combine it with Pixels or Fade to reveal the route while the camera remains still.
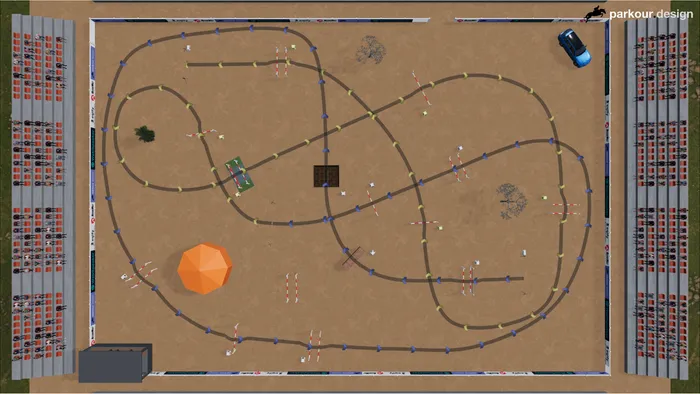
Entire arena from above
This camera remains directly above the arena. It provides a clear overview of the course layout, especially with visible obstacle numbers and a contrasting route line. The arena is fitted to the selected aspect ratio, so a portrait frame and a landscape frame can show different amounts of space around it.
The two entire-arena options use automatically composed views. To export a particular viewpoint that you position yourself, capture it with P, even if you keep the camera stationary during the capture.
Recorded user activity
This option becomes available after you finish a P capture. It replays your camera position, looking direction, and field-of-view changes with their original timing. Pauses in your movement remain pauses in the replay.
The capture stores camera motion, so the exported scene uses the appearance settings active when you render it. Changes to lighting or other scene options during the original capture are not stored as an editable sequence of scene changes. You can therefore rehearse with a lighter scene, stop the capture, adjust the appearance, and export using the same camera path.
A newly completed capture replaces the previous one. Closing the 3D viewer clears the captured path. The route-speed slider does not retime recorded activity; capture a new take if you want a different movement pace.
3. Customize the animation
Animation start and end
The Animation start and Animation end selectors under Customize the animation add camera movements before and after the selected course camera. They work in the live preview as well as in the exported video. An intro keeps the course at its first frame until the opening movement finishes; an outro keeps the completed route visible while the camera moves to its final position.
| Animation start | Behaviour |
|---|---|
| No intro | Starts the selected course camera and course animation immediately. |
| Fly in from top view | Begins with an overhead view of the whole arena, then flies and turns smoothly into the selected camera’s opening position. |
| Fly-in over the arena | Starts beyond the audience stands, on the backward extension of the selected camera path and high enough to clear the stands. It continues directly into the opening movement while turning smoothly from the direction of flight to the selected camera’s starting angle. |
| Animation end | Behaviour |
|---|---|
| Stop immediately | Ends as soon as the selected course camera reaches its final frame. |
| Fly away | Continues for four seconds in the direction of the camera’s final movement. The camera turns to face that direction, tilts gently towards the sky, and gains enough height to pass above the audience stands. |
| Fly to top view | Moves smoothly to the overhead arena view over four seconds, then holds that final view for two seconds. |
These movements extend the total video duration. Use No intro and Stop immediately when no additional camera movement is required.
Course effects and route speed
The Course effect in the video window controls how much of the route is revealed during the sequence:
| Effect | Behaviour |
|---|---|
| Entire course visible | Shows the complete route from the beginning. |
| Pixels | Reveals the route progressively with a pixel-style leading edge. |
| Fade | Reveals the route progressively with a soft, fading leading edge. The revealed section remains visible behind it. |
The route-speed slider runs from 100 to 800 m/min, in steps of 5 m/min, and initially takes the competition speed from the design. It controls automatic course-camera timing and the reveal pace. For example, a 350 m route at 350 m/min takes about one minute; at 700 m/min it takes about half a minute. The fixed entire-arena cameras use the same course duration. Recorded user activity keeps the duration of your capture.
Export progress, stopping, and downloads
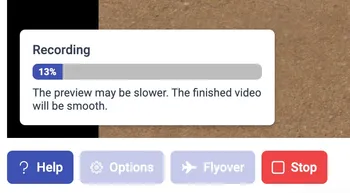
After Record, the viewer shows Preparing recording, Recording, and Saving video. While exporting, the camera is controlled by the selected sequence and normal scene controls are disabled. Let the saving phase finish so the encoder can complete the file.
Stop, or V, finishes early and downloads the frames produced so far, provided at least one frame has been captured. Closing the entire 3D viewer during export discards the unfinished export, so use Stop if you want a shorter video.
The file name uses the event name and design title, with an MP4 or WebM extension. The file contains the rendered scene and Parkour logo, but not the viewer buttons or dialogs. It has no audio track.
For a quick test, use Full HD at 30 FPS. Increase the resolution, frame rate, or compression quality after checking a short export.
Solving common problems
The scene does not start, or a landscape fails to load
Open Options → Advanced and try Automatic rendering. If you selected WebGPU explicitly and it is unavailable, choose Automatic or WebGL. Check that browser hardware acceleration is enabled. A landscape loading failure leaves the previous landscape visible, so you can continue working or select another one.
Moving around feels slow
Use the Performance profile, fewer audience rows, or lower occupancy. Reduce the live-view pixel multiplier and shadow-map resolution, or switch shadows off. Remember to save settings that require a reload. Lowering video resolution affects export work, while the live-view pixel multiplier affects interactive navigation.
The flyover does not follow the intended course
Return to the design editor and check the route connections and obstacle order. Automatic course views need a usable route; placing obstacles alone does not define the sequence. Use a P capture if you want to film a tour that does not follow the course route.
The preview is slow while recording
The exporter waits for each frame to be rendered and encoded. Export may therefore take longer than the downloaded video’s duration. For a shorter wait, lower the resolution or frame rate, simplify the scene, or shorten the sequence.
Video recording fails, or the file is not the format I expected
Try Automatic codec, a different codec, or Full HD at 30 FPS. Encoder availability is separate from 3D graphics support. Automatic can produce MP4 or WebM; explicitly choose H.264 or HEVC when you need MP4. Keep the viewer open until Saving video has finished, then check the browser’s downloads.
The recorded camera option is unavailable
Stop the automatic flyover, position the camera, press P, move around, and press P again. A red surround and a camera-movement message indicate capture is active. The replay option becomes available after you stop. If you closed the 3D viewer, the temporary capture has been cleared and you need to record another take.
The keyboard does not move the camera
Close or hide the relevant settings window as appropriate, then return to manual viewing and click the scene to capture the mouse. Check Help for the controls enabled in your interface. On touch layouts, use the virtual joystick and footer buttons.